A day at the counter: open a shift, take orders, send them to the kitchen and close up.
2.1The Bill&Go POS app
The POS as an app for iPad, iPhone and Android, which keeps taking orders without a connection.
Who
Owner, managers and staff
The POS app is the same POS as pos.billandgo.app, on the App Store for iPad and iPhone (search for Bill&Go POS) and coming to Google Play for Android. Sign in with the same Username or email, Business code and Password.
Its tabs are Orders, New order, Tables (when the store has tables) and Accounting. The printing status, Inbox, Help, Settings and Sign out are at the top; on an iPhone, the last three are under More.
On an iPad in landscape, the menu and the ticket sit side by side. On a phone, the ticket is a sheet behind the order bar.
It chimes for new online orders and orders from tables.
Good to know. The app prints through your shop’s Printing app or box, like the web POS, or by itself with This device prints. The kitchen screen and reservations are on the web POS for now.
2.2The POS Settings screen
This device’s own settings in one place: sound, printing, the customer screen, the lock, notifications and language.
Who
Everyone at the POS; a few rows are for the owner and managers
Where
POS → Settings
Settings holds what belongs to this device. The shop’s own settings stay in the console. Nothing here needs an open shift.
Find it in the POS app
iPad: the gear at the top, beside Help.
iPhone: under More at the top.
Android: the gear at the top.
Before the POS is open: a Settings button on the screen that asks you to choose a store or open the POS.
Printing:This device prints, and whether the shop is printing, which opens the printing window.
This device:Customer screen on the second display, on Android while a second screen is there; Lock this device to the app, on Android for the owner and managers, or a line on Guided Access on an iPad or iPhone (see Lock a device); and Scale for a USB scale, on Android.
Notifications and language:Notification settings and Language. These two are yours, not the device’s.
A switch saves the moment you flip it. This device is left out when nothing in it applies, as on a cashier’s iPhone. Send feedback and Sign out stay at the foot of Accounting.
On the web POS
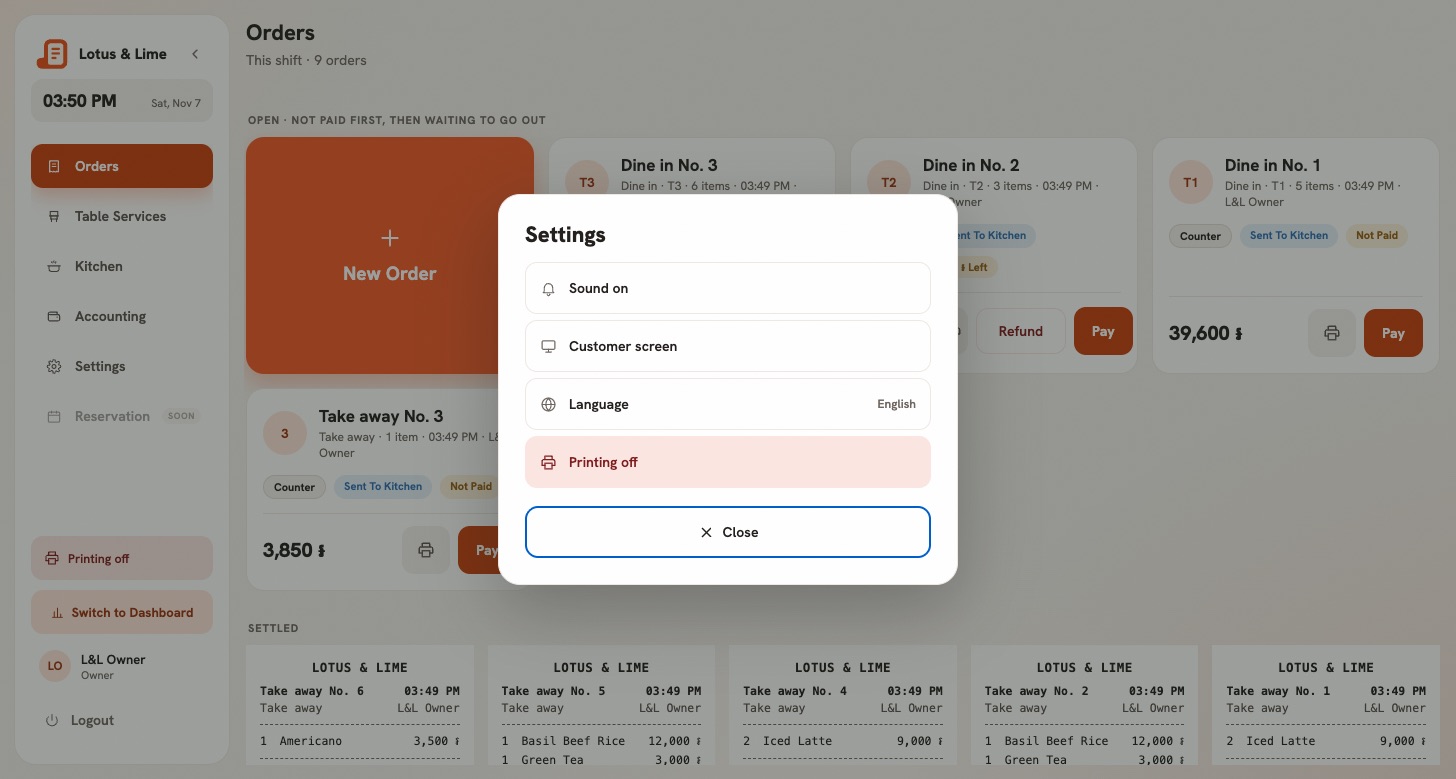
Press Settings on the side rail. A window opens over the order, so nothing on screen is lost. It has Sound on or Sound off, Customer screen, Language and the printing status. While the sound is off, the Settings button shows a crossed-out bell.
Settings on the web POS opens over the order.Full size
2.3Choose the store this POS is at
Tell the POS which branch it stands in, and what “not yet assigned” means.
Who
Owner, managers and staff
Where
The POS, after signing in
A POS works for one store at a time. With one store there is nothing to choose. With more, the POS asks once and remembers it on that computer or tablet.
Web POS: with two stores, both names sit in the side rail; with three or more, one button opens Which store is this till at?
POS app: the first time, Which counter is this? asks you to pick the store this device stands at.
Switching stores with an order on screen asks first: Stay at the store you are at, or Move and clear the order.
“You are not yet assigned to a branch”
A manager or staff member works only at the stores the owner or a manager chose for them. Until then the POS says You are not yet assigned to a branch. Ask the owner or a manager to set where you work (see Add a person), then press Check again in the app or sign in again.
2.4Open a shift
Count the float in the drawer and open the POS, so you can start selling.
Who
Owner, managers and staff
Where
POS → Accounting (it opens by itself when no shift is open)
Nothing can be sold without an open shift. When none is open, the POS shows Open the till.
Count the money in the drawer, each currency on its own. Tap a note button for each note you hold, or type the total.
Press Open the till.
Check the amounts in Open the till with …? and press Yes, open the till. Press Go back to change them.
The shift starts with that float, and closing it later counts against it.
Someone else has the POS
The POS belongs to whoever opened the shift. If it says Dara has the till since 14:02:
Staff can only take over by counting it: press Count and close Dara’s drawer, close their shift, then open your own.
Managers can also press Step in: you sell, and the money goes into Dara’s drawer. A banner says so while you are stepped in.
The owner can work on any open shift; the banner still names whose drawer it is.
Good to know. Opening and closing a shift need an internet connection, on the web POS and the app.
2.5Take an order
Pick the order type, add products with their choices, and add notes for the kitchen.
Who
Owner, managers and staff
Where
POS → Orders → New order (POS app: the New order tab)
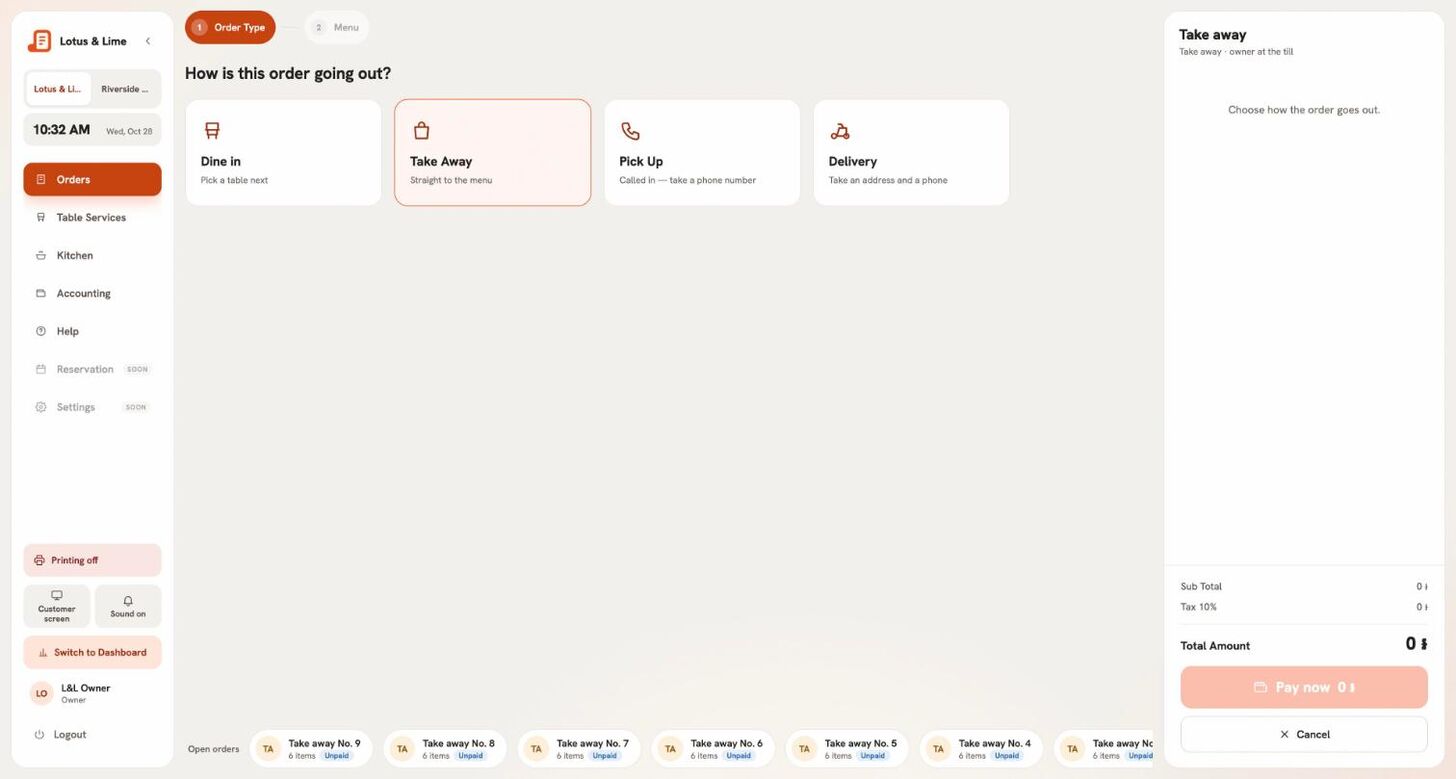
Open New order. The POS asks How is this order going out?
Pick Dine in (then the table, in Which table?), Take Away, Pick Up (a phone order: name and phone) or Delivery (name, phone, address and who delivers it).
Tap products to add them. Search in English or Khmer, or tap a category. Low and None left show stock that is running out.
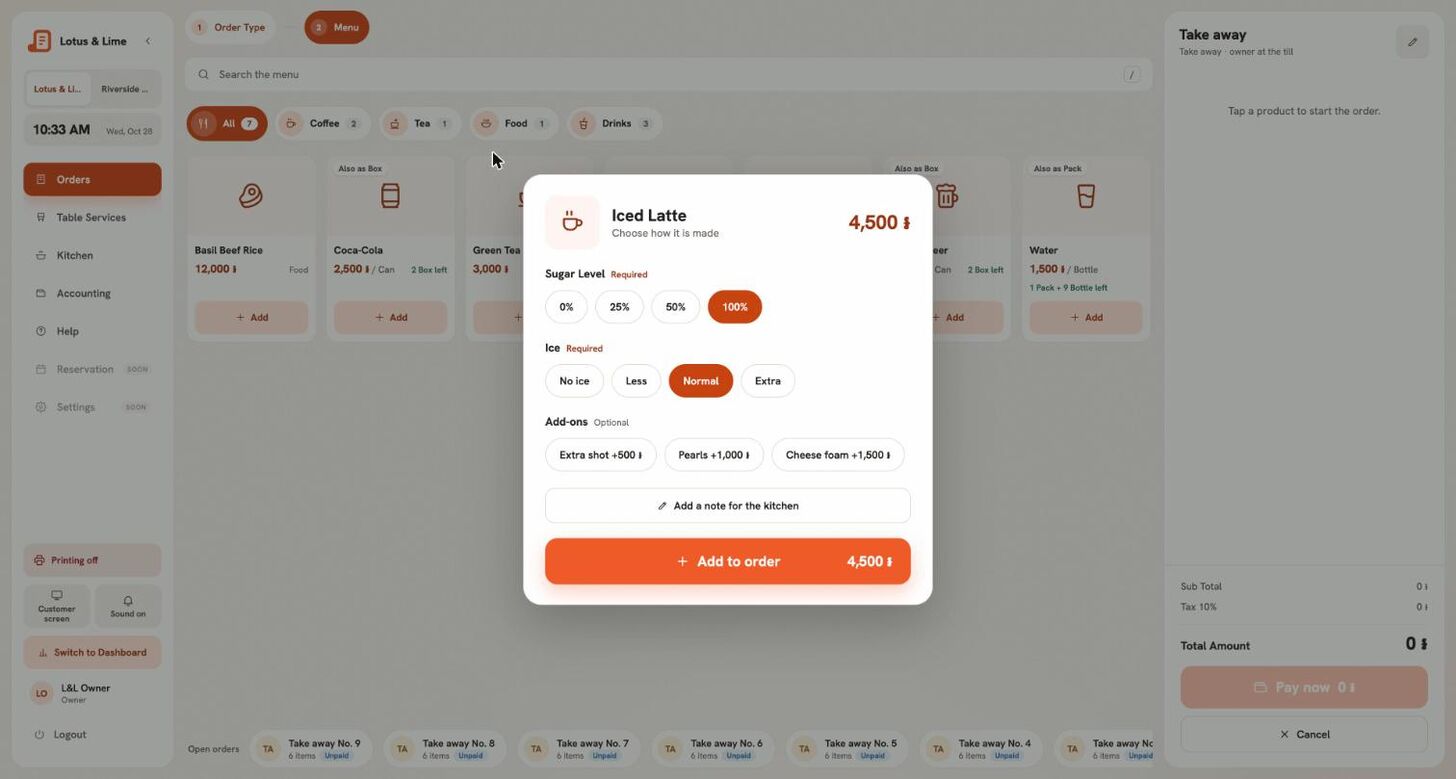
If a product has choices, like sugar level or size, pick them in Choose how it is made and press Add to order. The usual choices are already picked; a Required group must be answered.
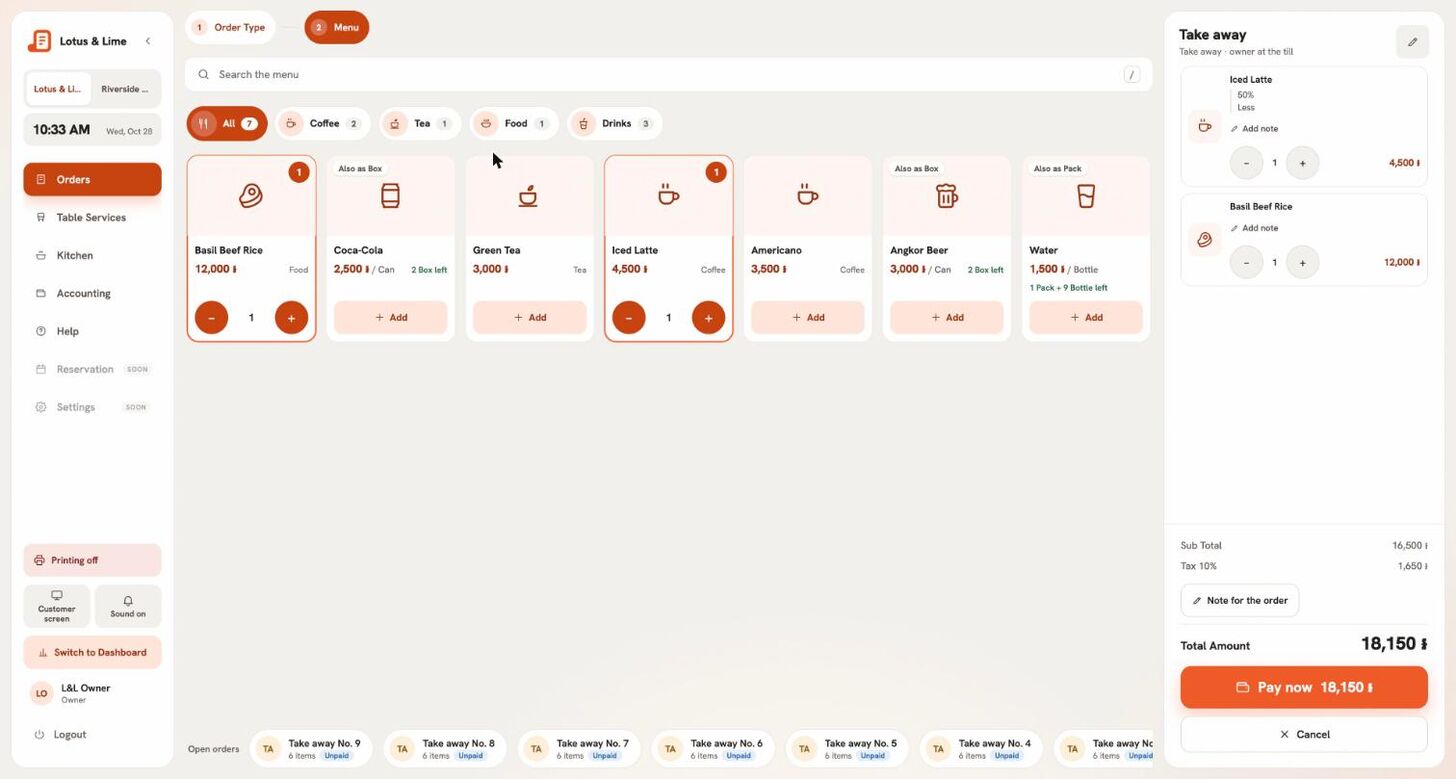
Change a quantity with the steppers. Add note on a line tells the kitchen something about that dish.
Step 1: the order type.Full sizeChoices for an Iced Latte: the usual ones are already picked.Full sizeThe ticket on the right, with the total and Pay now.Full size
Delivery orders
Pick who delivers it: your own rider, Grab, foodpanda, Nham24, WOWNOW, E-GetS, or Other. Paste a Google Maps or Apple Maps link in the address and the POS shows how far it is from the shop. An address outside the store’s delivery area cannot be taken.
Adding to an open order
Tap the order in Open orders, or the seated table. The ticket shows what is already on this order and what you are adding now; the kitchen gets a ticket marked ADDED TO ORDER.
Tip. Leaving a ticket with items not yet sent asks first: keep it for later, or discard it. Nothing is lost by accident.
2.6Send an order to the kitchen
Send the order now and take the money at the end, with the kitchen ticket printed by itself.
Who
Owner, managers and staff
Where
POS → the order’s ticket
A new order has two ways on:
Send to kitchen, pay at the end — for Dine in, Pick Up and Delivery. The order stays open until it is paid.
Pay now — take the money first; the kitchen gets the order once it is paid. A plain counter Take Away has only this.
On an open order with new items, the buttons are Send to kitchen and Discard new items.
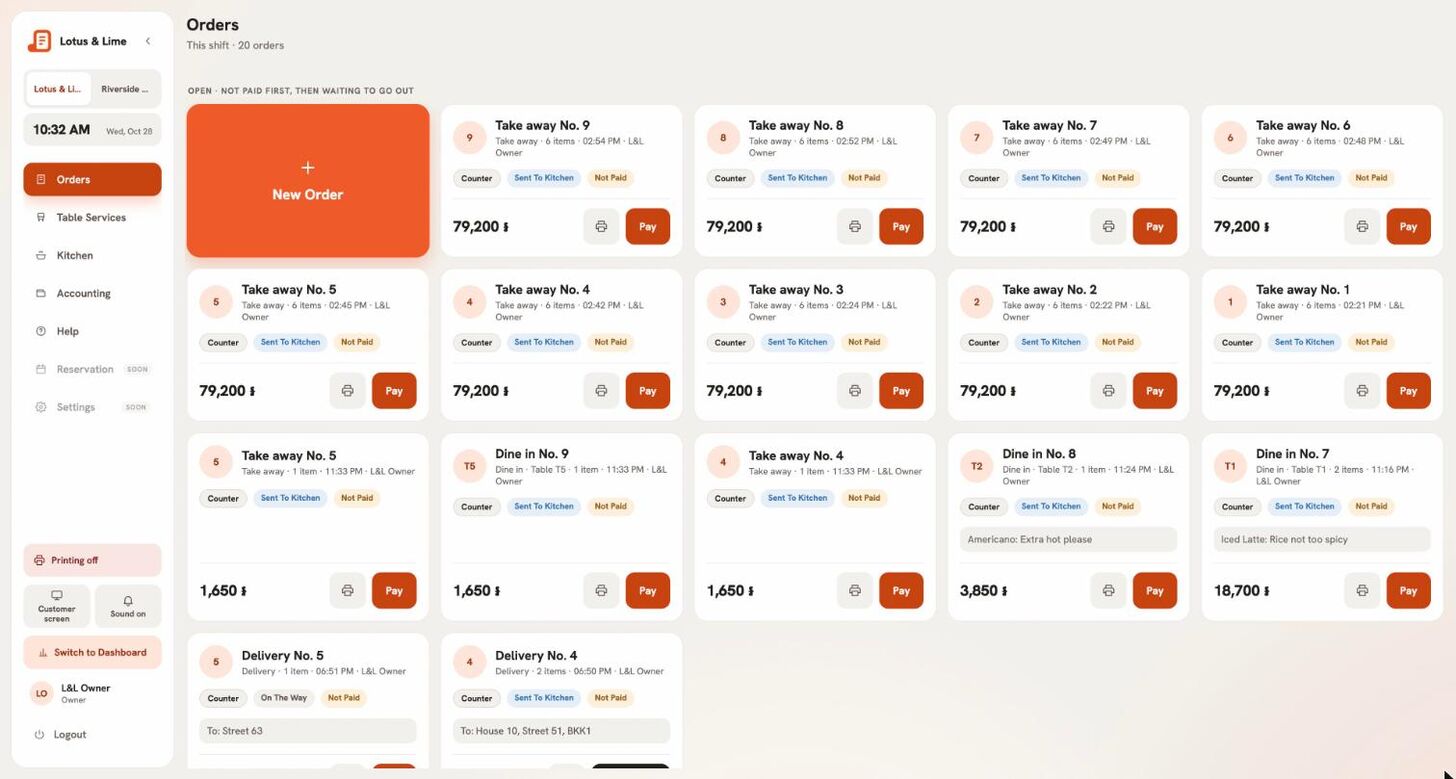
Open orders on the POS, each with its call number and Pay.Full size
The POS says Sent to kitchen (or Sent to kitchen · Table 4). The kitchen ticket and any cup stickers print by themselves; the bill does not.
Good to know. Which printer gets which dish is decided by the category: see Which printer prints what.
2.7Promotions and deals at the POS
How deals land on the bill by themselves, how to take one off, and how to add a counter-only deal.
Who
Owner, managers and staff
Where
POS → the order’s ticket
Promotions that apply by themselves show as discount lines on the bill as soon as the order fits them. Nobody has to remember them.
To take one off, press ✕ on its line. It shows as off; press it again to put it back. It stays off when more is added.
Deals the cashier picks are under Add a deal (or Deals). Bill&Go checks each one still fits.
Good to know. The POS cannot make up a discount or change a price. Deals are set up in the console: see Add a promotion. Discounts never add up on each other, and tax is worked out after the discount.
2.8Call numbers and order references
How “Take away No. 2” is counted, and the reference printed on every paper.
Every order gets a call number, counted separately for each order type and starting again each shop day: Dine in No. 1, Take away No. 1, Delivery No. 1. It is always said with its type, like Take away No. 2, so two customers never hear the same number. A dine-in order is called by its table.
Each order also has a reference like 20261028-0042: the date, then a count for that store. Both print on every ticket and bill.
Whether call numbers print is a store setting: Print a call number on every order under the store’s At the counter tab.
2.9Move an order on: accept, ready, delivered
The one big button on an order that takes it to its next step, and what each step means.
Who
Owner, managers and staff
Where
POS → the order
An open order always has one big button with its next step. Bill&Go decides which step comes next, so the POS and the console always agree.
Accept — an order from a phone, a table or another system, once you can make it.
Send it out — a delivery leaves with the rider; it can go before it is paid, because the rider brings the money back.
Done / Collected — the customer has it.
Delivered — the rider handed it over.
If your kitchen marks orders cooking and ready on the kitchen screen, the order stays open until it is handed over. Switch this in the store’s At the counter tab.
2.10Accept or turn down online orders
Orders from a phone, the table QR or the shop API arrive at the POS with a chime and wait for you.
Who
Owner, managers and staff
Where
POS → the strip at the top; Console app → Orders
An online order arrives in a strip at the top of the POS with a chime, and as a notification on the apps. It waits for you.
Accept — the kitchen ticket prints.
Turn down — pick why: Sold out, The kitchen is closed, Too busy right now, or Other.
With more than one branch sharing online orders, Too busy right now passes the order to the branch that can make it soonest. The POS says Passed on to that branch.
Good to know. A paid order cannot be turned down: the owner or a manager cancels and refunds it.
Tip. Print online orders only once they are accepted with the printing rule Print online orders once they are accepted on the Printers page.
2.11The chime for new orders
The POS plays a sound for new online orders and orders from tables. How to mute it, and what the switch does not cover.
Who
Everyone at the POS
Where
POS → Settings → Sound
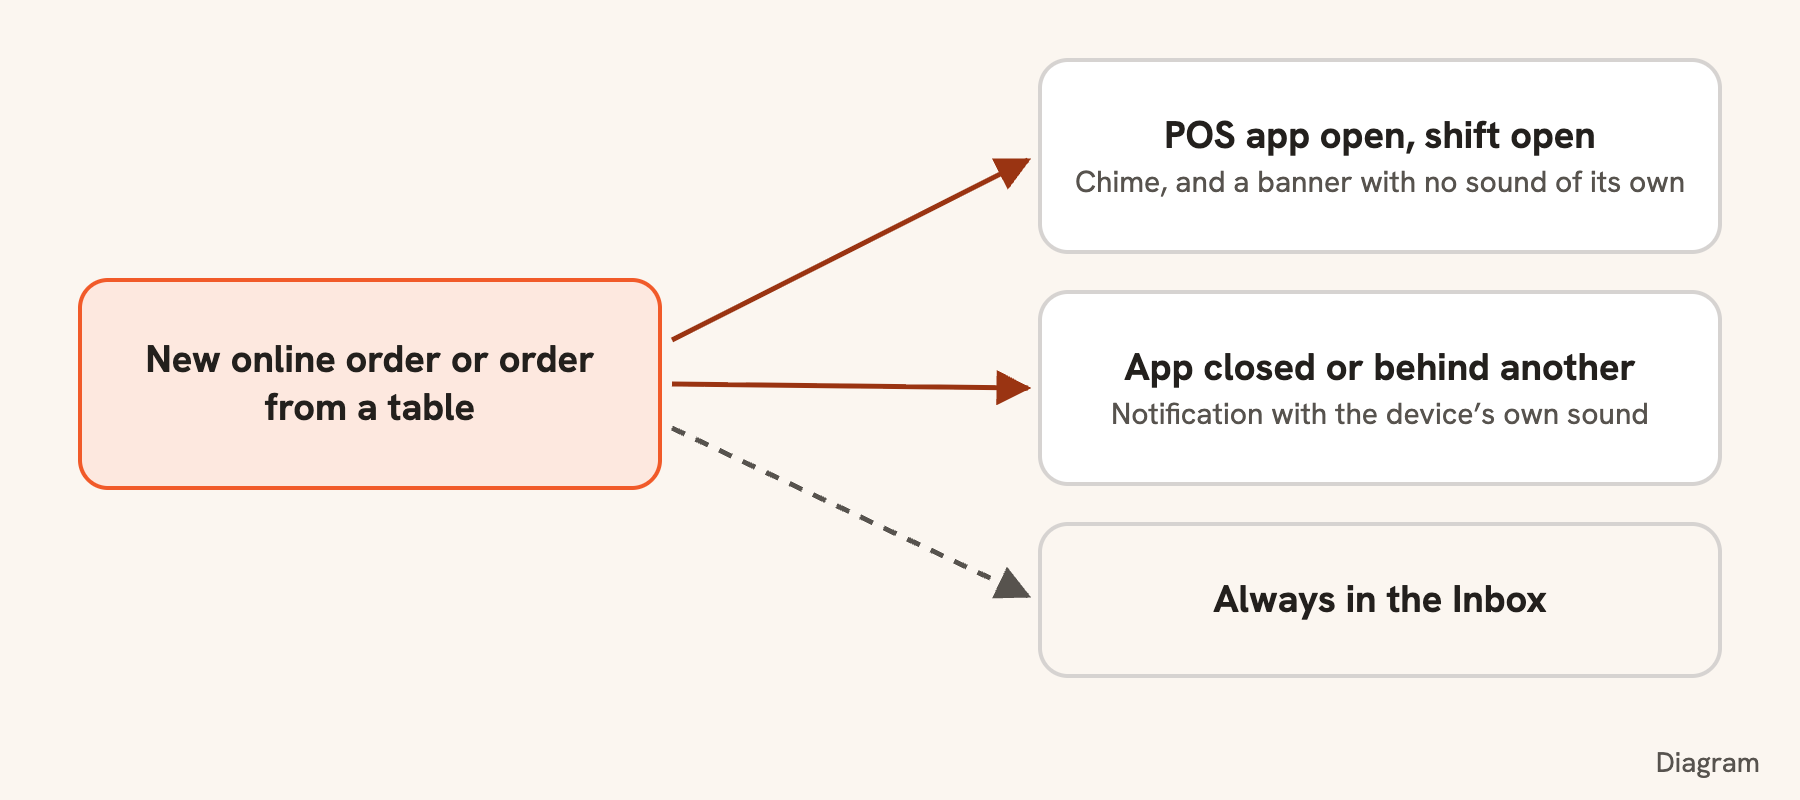
When an online order or an order from a table comes in, the POS plays a chime, so nobody has to watch the screen. The order then waits for someone to accept or turn it down.
Under Sound, switch Chime for new orders on or off.
It is on until someone turns it off. The choice stays on that device, whoever signs in.
Turning it on plays the chime once, so you can hear it.
It plays on any tab while the app is open and a shift is open.
Its loudness is the device’s media volume, not the ringer. On an iPhone or iPad it plays with the silent switch on.
It mixes with other sound, so the shop’s music carries on.
On the web POS
Press Settings on the side rail, then Sound on or Sound off. Each computer or tablet remembers its own. A browser lets a page make sound only after one tap on it, so tap the POS once after opening it. While the sound is off, the Settings button shows a crossed-out bell.
A diagram, not a screen: how a new order reaches you.Full size
What the switch does not cover
It is about the open app. With the app closed or behind another one, a new order comes as a notification with the device’s own sound, muted or not.
While the app is open and muted, those orders still show as a banner, with no sound.
An order for another of your stores keeps the notification’s sound, because this POS is not watching that store.
Print the bill before paying, a kitchen ticket again, or one cup sticker.
Who
Owner, managers and staff
Where
POS → the order → Print bill / Kitchen ticket
Print bill on an unpaid order prints a bill marked NOT PAID for the table to check. Printed again, it says COPY 2, COPY 3.
Kitchen ticket opens a window: print the whole Kitchen ticket again (marked REPRINT), or Cup stickers, one or all.
On a paid order, Print bill or Print again reprints the receipt.
Every reprint says REPRINT and who asked for it. Cup stickers keep their numbers (2/3).
The POS never opens a print dialog: everything goes to your shop’s printing device, which is the Printing app, a box, or a POS app that prints. The printing button in the POS shows problems, like a printer out of paper, with Try again.
Good to know. Your shop can ask staff reprints to wait for a manager’s yes.
2.13Void an order or take a dish off
Stop an unpaid order or one dish, and tell the kitchen at the same time.
Who
Owner, managers and staff (staff: this shift’s orders only)
Where
POS → the order → More → Void order
Take one dish off
Open the order and press ✕ on the line.
Pick how many and why, and confirm. The POS says, for example, Took 2× Latte off · kitchen told, and the kitchen gets a TAKE OFF ticket.
This works while the kitchen is still on it. To take off the last dish, void the order instead.
Void the whole order
Open the order, press More, then Void order.
Pick the reason, or Other and type it, and confirm.
The kitchen gets VOID — DO NOT COOK, cups get VOID stickers, and the table is free again.
Good to know. Only unpaid orders can be voided. Staff can void orders from the current shift; older ones need the owner or a manager. A paid order is refunded instead: see Refund an order.
2.14Put cash in or take cash out
Record money added to or taken from the drawer during a shift, so the count still adds up.
Who
Whoever has the POS
Where
POS → Accounting → Cash in or out
Open Accounting and press Cash in or out.
Pick Put cash in or Take cash out, and the currency.
Tap the notes or type the amount.
Say why in Why: for example “Float top up”, “Paid a supplier” or “Taken to the bank”.
Press the button, which names what happens, like Take out $20.00.
It shows in the shift as Put in or Taken out, and the drawer count at closing includes it.
2.15Close a shift
Count the drawer, see if it is over or short, and print the shift summary.
Who
Whoever has the POS; anyone taking it over
Where
POS → Accounting → Close the POS
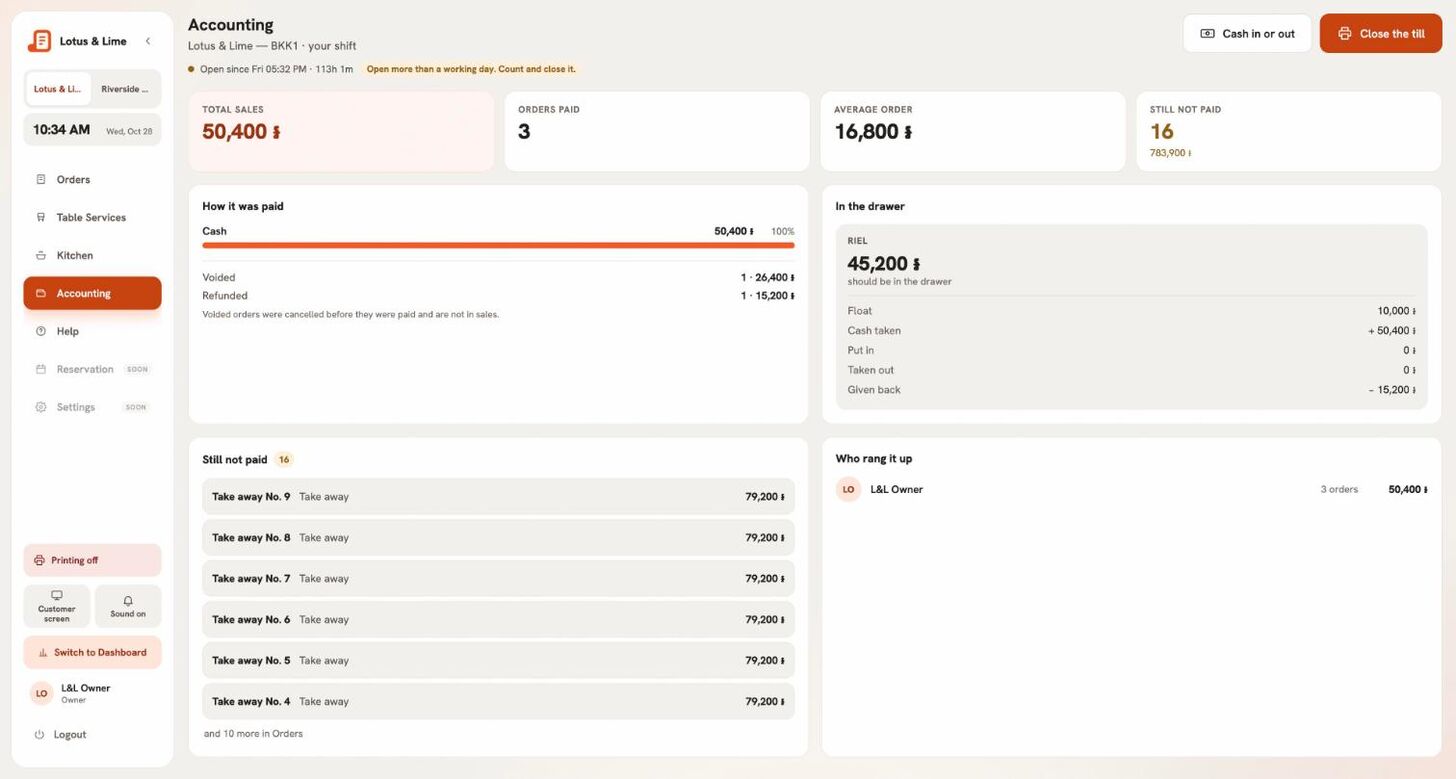
Accounting shows the shift so far: what should be in the drawer per currency (float, cash taken, put in, taken out, given back), sales, each payment method, voids and refunds, and sales by person.
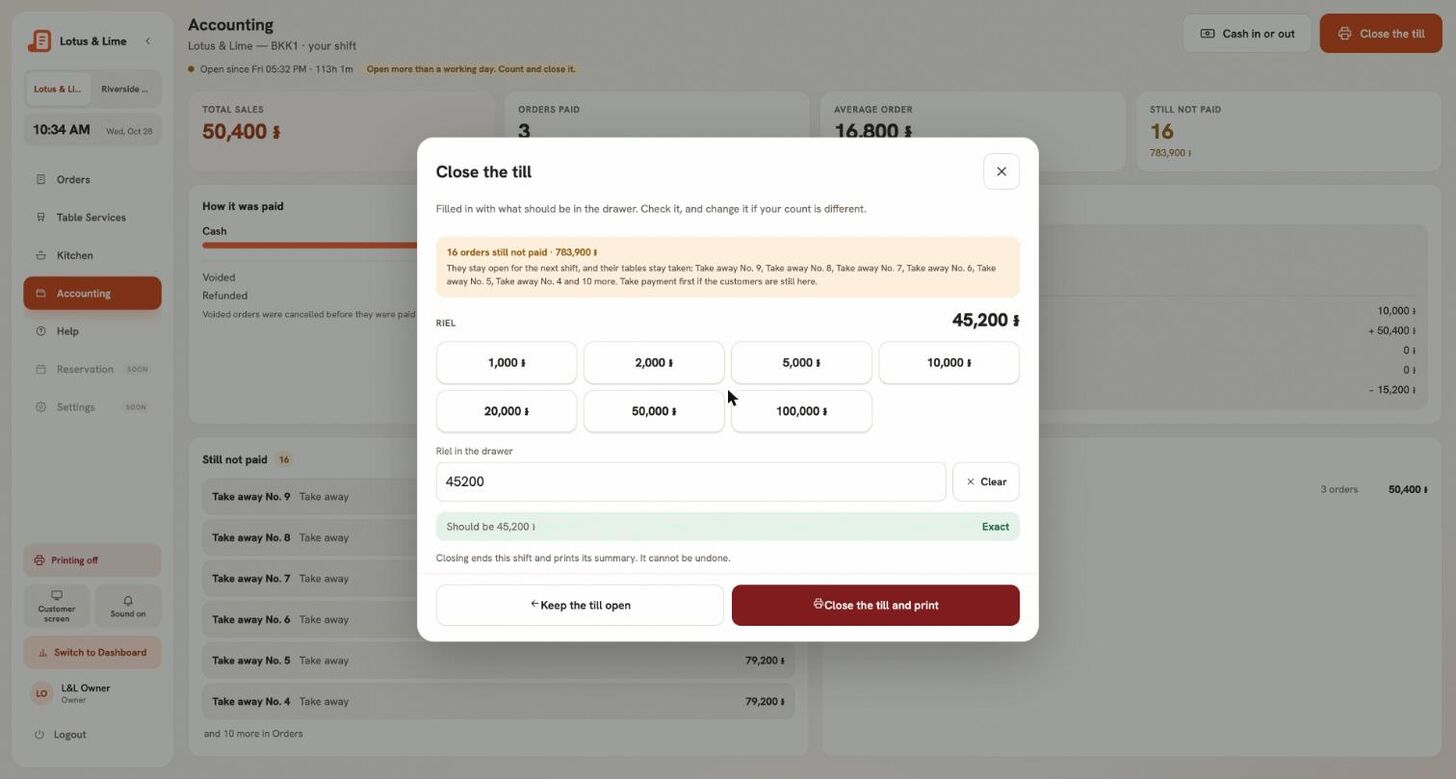
Each currency is filled in with what should be in the drawer. Count the drawer and change the figure if yours is different; each shows Exact, Over by or Short by.
If it is different, say why in Why the count is different.
Press Close the till and print, then Yes, close the till.
The summary prints. Open the next shift starts the next one.
Closing the POS: the count is filled in; change it if yours is different.Full size
Orders not yet paid stay open for the next shift and keep their tables.
Tip. On Starter and above, Keep the summary saves it as Excel, CSV or PDF.
Good to know. Taking over someone else’s drawer, you count it without seeing what it should be, so the count is honest.
2.16When the internet drops
What the POS app keeps doing without a connection, and what waits until it is back.
Where
POS app
The POS app keeps taking orders and cash when the connection drops. A bar says No connection and how old the menu is. Orders are kept on the tablet and sent in order, exactly once, when the connection is back.
Works offline
New orders and extra rounds
Cash payments
Removing an order not yet sent
Waits for the connection
Card and QR payments
Splitting a bill
Void, take off and refund
Opening and closing the POS, cash in and out
Printing and reprints
QR ordering at the table
An order taken offline is called Offline 1, Offline 2 until it is sent and gets its real number. Totals offline do not include deals; if the real total is different, the app tells you once what the change should have been.
Good to know. The web POS needs a connection to send orders. Its ticket survives a page reload, and an order sent twice by a retry is never rung twice.
2.17Show the bill on a customer screen
A second screen facing the customer with the bill, the KHQR to scan, and your own pictures when the POS is quiet.
Who
Owner and managers set the pictures
Where
Web POS → Settings → Customer screen; pictures in Console → Customer screen
Plug a second screen into the POS’s computer.
On the web POS, open Settings on the side rail and press Customer screen. A new window opens.
Drag the window to the second screen and make it full screen.
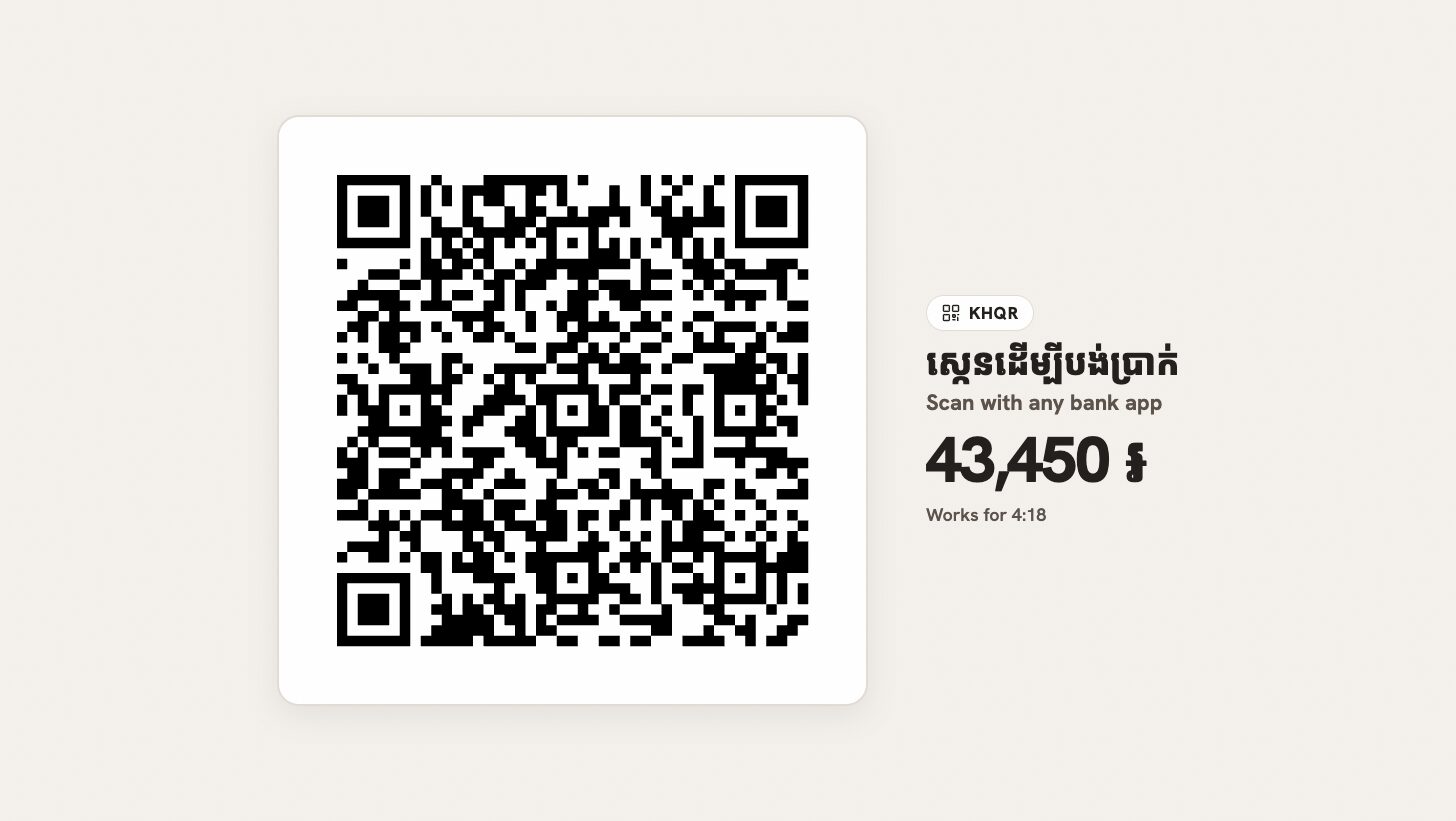
It shows the running bill, then Paid with the change. When a KHQR is shown for payment, the customer scans it there. When the POS is quiet, it shows your shop’s pictures.
Add the pictures in the console under Customer screen. The bill and Paid show on every plan; your own pictures need Starter or above.
The customer scans the KHQR on the customer screen.Full size
Good to know. This is how it works on the web POS. A Sunmi D3 or another Android POS with its own second screen shows the customer screen in the POS app: see Use a Sunmi D3 as your POS. An iPad or iPhone has none.
2.18Lock a device to the POS
Keep staff on the POS: the switch on Android, the PIN setting that makes it stronger, its limits, and Guided Access on an iPad.
Who
Owner and managers
Where
POS app → Settings → This device
A counter tablet can be kept on Bill&Go POS, so staff do not wander off to other apps. It keeps honest people on the POS; it is not a hard lock. Read the limits below before you count on it.
On Android
Sign in to the POS app as the owner or a manager. Staff do not see this switch.
Open Settings. Under This device, turn on Lock this device to the app.
Android asks in a window of its own. Say yes.
Turn on Android’s PIN setting, below. Without it, the lock is easy to leave.
The switch stays on that device, whoever signs in next. Signing out does not end the lock: the sign-in screen and Help still work.
Ask for PIN before unpinning
Android’s own button gesture leaves the lock: holding Back and Overview, or the same on the gesture bar. Android may even show how. With this setting on, that gesture asks for the device’s PIN. Bill&Go cannot set it for you:
In Android’s settings, give the device a screen lock with a PIN, and keep the PIN from staff.
Find app pinning, most often under Security, and turn on Ask for PIN before unpinning. The name and the place differ a little from one device to another.
What it cannot do
Android asks every time the lock starts: at the switch, and each time the app opens. Whoever stands there can say no. The switch then says Not locked right now.
The lock ends when the app closes or the device restarts, and the app does not open by itself after a restart. Someone has to open it and say yes again.
While locked, Android does not let the app open another one. Open Printers, Open settings and the BasilBook link do nothing, and sign-in with Telegram is hidden. Do not count on Google or Apple sign-in either: use a password.
Choose a USB scale before you lock the device: Android’s question about it may not come up while locked.
To unlock
An owner or a manager signs in, opens Settings and turns the switch off. Settings also opens from the screen that asks to open the POS, so a device with no open shift can be let go too.
On an iPad or iPhone
Apple lets an app lock itself only on a managed device, so there is no switch. Use Apple’s own Guided Access. Owners and managers see a line about it in Settings.
In the iPad’s Settings, open Accessibility, then Guided Access. Turn it on and set a passcode.
Open Bill&Go POS.
Press the side button three times (the top button or the Home button on some iPads) and press Start.
To leave, press it three times again and type the passcode.
2.19Use a Sunmi D3 as your POS
Set up a Sunmi D3: its built-in printer, what to print there, its customer screen and the cash drawer.
Who
Owner and managers set it up
Where
POS app on the Sunmi → Settings
The Bill&Go POS app runs on a Sunmi D3 as on any Android tablet, and uses what the D3 has: its own 80mm printer and its second screen, facing the customer. Other Sunmi POS devices with a built-in printer, like the T2, set up the same way.
Set up printing
Sign in to the POS app on the D3 as the owner or a manager, and choose the store.
Open Settings, then This device prints.
If the D3 is the only printing device in the shop, choose Everything for this store. Choose Only this till’s papers only when a printing computer or box prints the rest.
Press Turn on printing.
Under This till’s printer, leave Bills on. Tap Kitchen tickets as well only if kitchen tickets should print at the POS.
Press Add this till’s printer, then Print a test page.
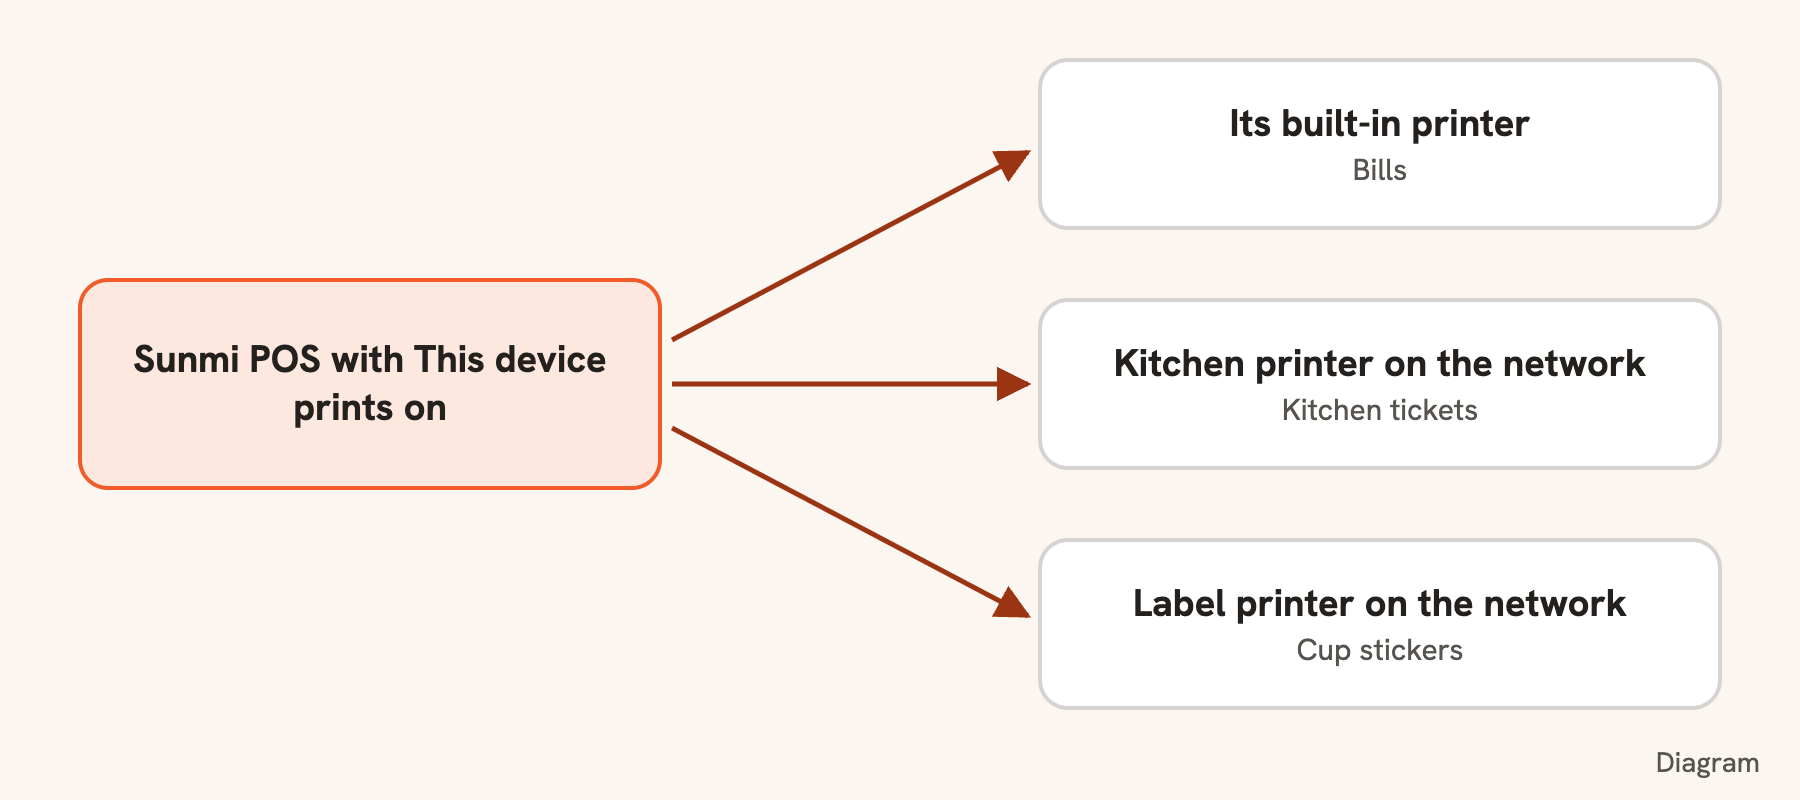
A diagram, not a screen: a Sunmi POS with Bills on its own printer.Full size
Bills only, or kitchen tickets too?
A POS uses its own printer before any other of that type, so what you give it decides where the paper comes out:
With a Kitchen printer on the network: keep Bills only. The D3 sends kitchen tickets to that printer by its address.
With Kitchen tickets on as well: they print at the POS, and the Kitchen printer stays quiet for what the D3 prints.
With no Kitchen printer at all: kitchen tickets print at the POS either way, because a store with no Kitchen printer prints them on its Receipt printer.
Cup stickers need a Label printer on the network; the built-in printer does not print them. It shows on the console’s Printers page like your other printers, and only the D3 can print on it.
Good to know. If the D3 is off or stops answering, its orders go to the store’s other printing devices after a short while, and those use their own printers. With no other device, tickets wait. Keep the app signed in: it prints only while someone from the shop is signed in.
The customer screen
Open Settings.
Under This device, turn on Customer screen on the second display.
It shows your pictures or logo when the POS is quiet, the order as it is rung up with its total, the KHQR to scan, then Paid and Thank you. The switch shows only while a second screen is there, and stays on that device. Add your pictures in the console: see Show the bill on a customer screen.
The rest of the counter
Cash drawer: plug it into the D3 and choose its printer for the store: see Open the cash drawer.