




Part 4

Printing

What prints the tickets, how to add printers, which paper goes where, and what to do when one stops.

4.1Set up printing on a computer

Install Bill&Go Printing on a Windows or Mac computer in the shop and pair it with a code.

Who
Owner and managers
Where
Console → Printers → Printing computers

Tickets print from a computer that stays on in the shop during service, on the same network as the printers. The POS sends every ticket there, so no print dialog ever opens. No computer in the shop? See Add a Printing Core box or Print from the POS app.

  1. Install Bill&Go Printing on that computer: from the Microsoft Store on Windows, or the Mac app.
  2. In the console, open Printers, then Printing computers, and press Add a printing computer.
  3. Give it a Name staff will know, like “Counter PC”. With more than one store, choose what it Prints for. Press Get a code.
  4. Press Copy, open Bill&Go Printing on the computer, paste the Code and press Connect.
  5. It says Paired as Counter PC. Tickets will print here. Now add your printers.
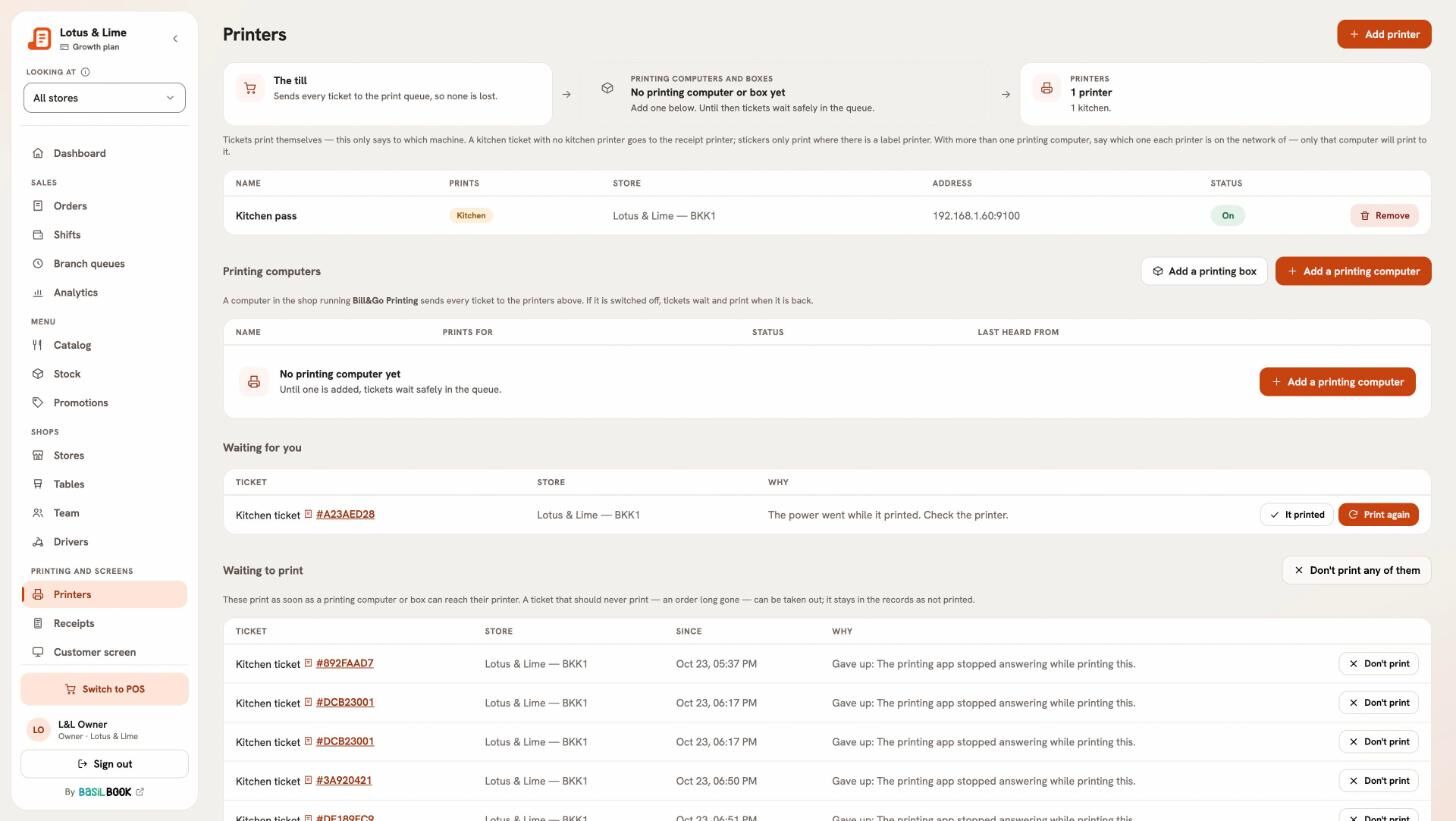
The console’s Printers page: the Receipt, Kitchen and Label printers, Printing computers with Add a printing computer, and the printing rules
The Printers page. Tickets print once a printing computer is added.Full size

The code works once, for 15 minutes. If it runs out, press New code.
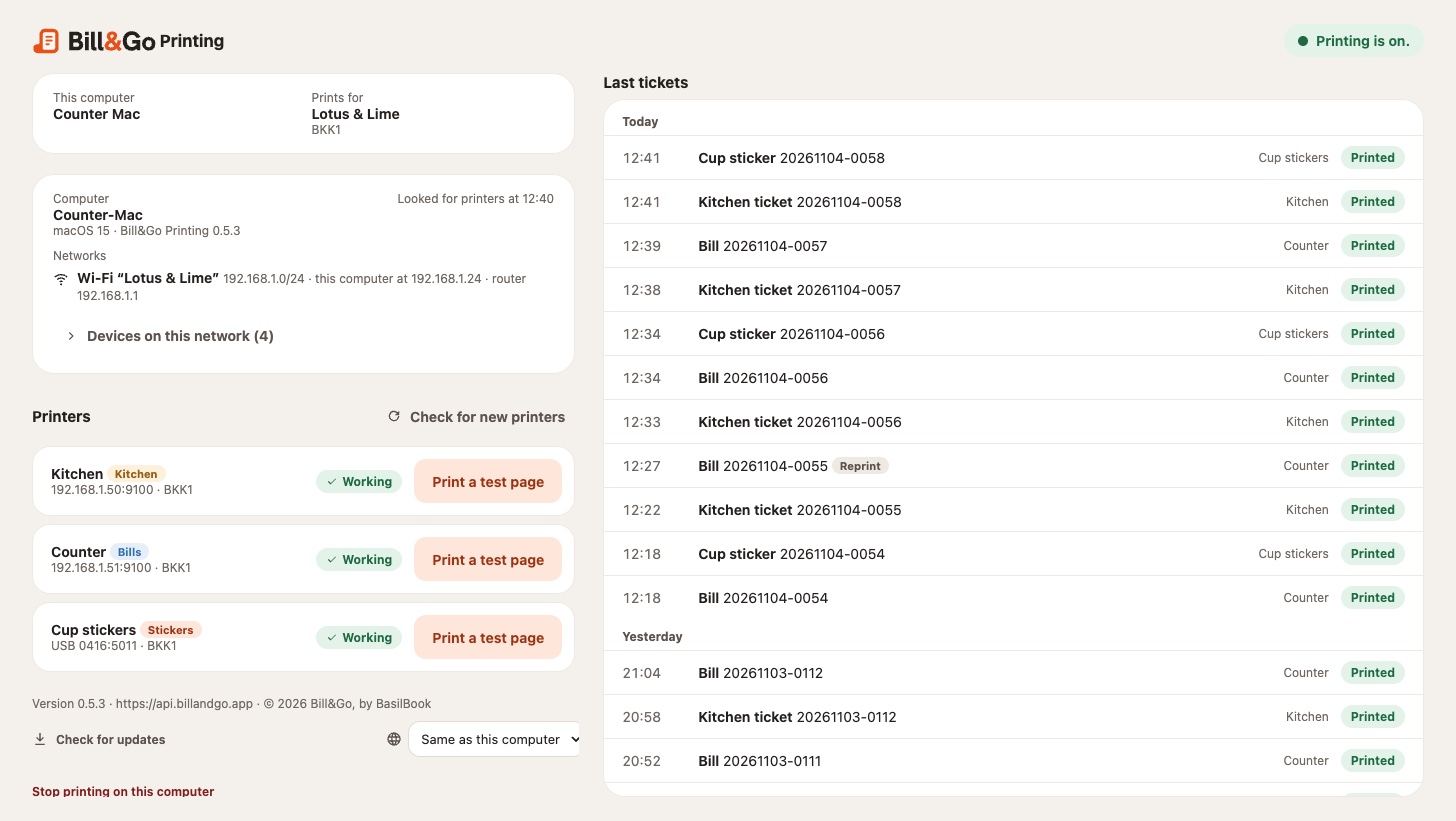
The Bill&Go Printing window on a computer: the shop it prints for, its printers and the last tickets
Bill&Go Printing on the computer, once it is paired.Full size

Tip. The app starts by itself when the computer starts, and lives in the tray (Windows) or menu bar (Mac). A green dot means Printing is on.

Good to know. No Microsoft Store on that computer? Use the Windows installer. Windows may warn you the first time: click More info, then Run anyway.
4.2Add a Printing Core box

Pair a Bill&Go printing box by scanning the slip it prints, then typing the code it prints next.

Who
Owner and managers
Where
Scan the slip with your phone (or Console app → Manage → Printers → Add a printing box)

A Printing Core box does the Printing app’s job without a computer, and also prints to printers plugged into it by USB.

  1. Plug the box into the network and power it on. It finds a printer and prints a slip that says Scan to add.
  2. Scan the QR code with your phone and sign in if asked. The page Add a printing box opens.
  3. Give it a Name, like “Bar box”, choose what it Prints for, and press Add this box.
  4. The box prints a second slip with a six-digit code. Type it in Code on the slip and press Add this box.
  5. The box prints Added to your shop. It is ready.

No camera to hand? Type the Box id printed under the QR code (BG-CORE-…).

The box looks for new printers every few minutes; they appear under New printers found with Add as Receipt, Kitchen or Label. It updates itself only while the shop is closed.

Good to know. Three wrong codes stop the pairing; start again from the first slip.

Tip. Setting up a box of your own on a Raspberry Pi takes a technician. Ask us and we will help.

4.3Print from the POS app, with no computer or box

Turn on This device prints, and a phone or tablet prints the shop’s tickets to your network printers.

Who
Owner and managers
Where
POS app → Settings → This device prints

A phone or tablet with the POS app can do the printing itself, so a small shop needs no printing computer or box. It prints to network printers on the same wifi, by the address on the console’s Printers page.

  1. Add your printers in the console first.
  2. Sign in to the POS app as the owner or a manager, and choose the store.
  3. Open Settings, then This device prints.
  4. Choose what it prints, and press Turn on printing.

What it prints

  • Only this till’s papers: the tickets for orders started on this device. Online orders, tickets from other devices and shift summaries wait for another printing device.
  • Everything for this store: every ticket for the store, like a printing computer.

Tip. If this is the shop’s only printing device, choose Everything for this store. Otherwise online orders and shift summaries have nothing to print them.

What to know

  • It prints to network printers only, not USB or Bluetooth.
  • It prints while someone from the shop is signed in to the app.
  • On Android it keeps printing with the screen off or another app open, and shows “Printing for” the store in its notifications.
  • An iPhone or iPad prints only while the app is on screen. Allow Local Network when it asks: that is how it reaches the printers. For a device kept only for printing, Guided Access holds it on the app.
  • A ticket it cannot print goes back in the queue, for a printing computer or box if the shop has one.
  • It counts as one of your plan’s printing computers or boxes. The console’s Printers page lists it, and can switch it off.

To stop, press Stop printing on this device. Tickets then wait for another printing device.

4.4Add a printer

Tell Bill&Go about a receipt, kitchen or sticker printer: where it stands, what it prints and its address.

Who
Owner and managers
Where
Console → Printers → Add printer
  1. Open Printers and press Add printer.
  2. Pick the Store it stands in.
  3. Pick its Type: Receipt (bills and the shift slip), Kitchen (kitchen tickets) or Label (cup stickers).
  4. Give it a Name, and choose how it is Connected by: Network or USB.
  5. For a network printer, type its IP address. Leave Port at 9100 unless you know otherwise.
  6. Press Add printer.

Tip. Don’t know the IP address? Most printers print a self-test page with it when you hold the feed button while switching them on.

Paper and copies

Open the printer to set Paper in it — 58mm or 80mm, or as the template says — or Stickers in it for a label printer, and how many Copies of every ticket it prints. The printer’s own setting wins over the template.

Good to know. USB printers only print from a Printing Core box. On a computer with the Printing app, connect the printer to the network instead.

Sunmi POS devices

A Sunmi POS device (D3, T2…) has its own 80mm printer. Bill&Go POS prints on it once This device prints is on: no address to type.

  1. In Bill&Go POS on the Sunmi, turn on This device prints.
  2. Under This till’s printer, tap the papers it prints: Bills, Kitchen tickets or both. Then tap Add this till’s printer.
  3. Tap Print a test page.

It shows here with your other printers, by the name of its device. Change its papers and store here; only that device prints on it. It prints bills and kitchen tickets, not cup stickers. A POS uses its own printer before any other of that type: see Use a Sunmi D3 as your POS for which papers to give it.

4.5Which printer prints what

How bills, kitchen tickets and cup stickers find their printer, what a category decides, and what happens with several printers.

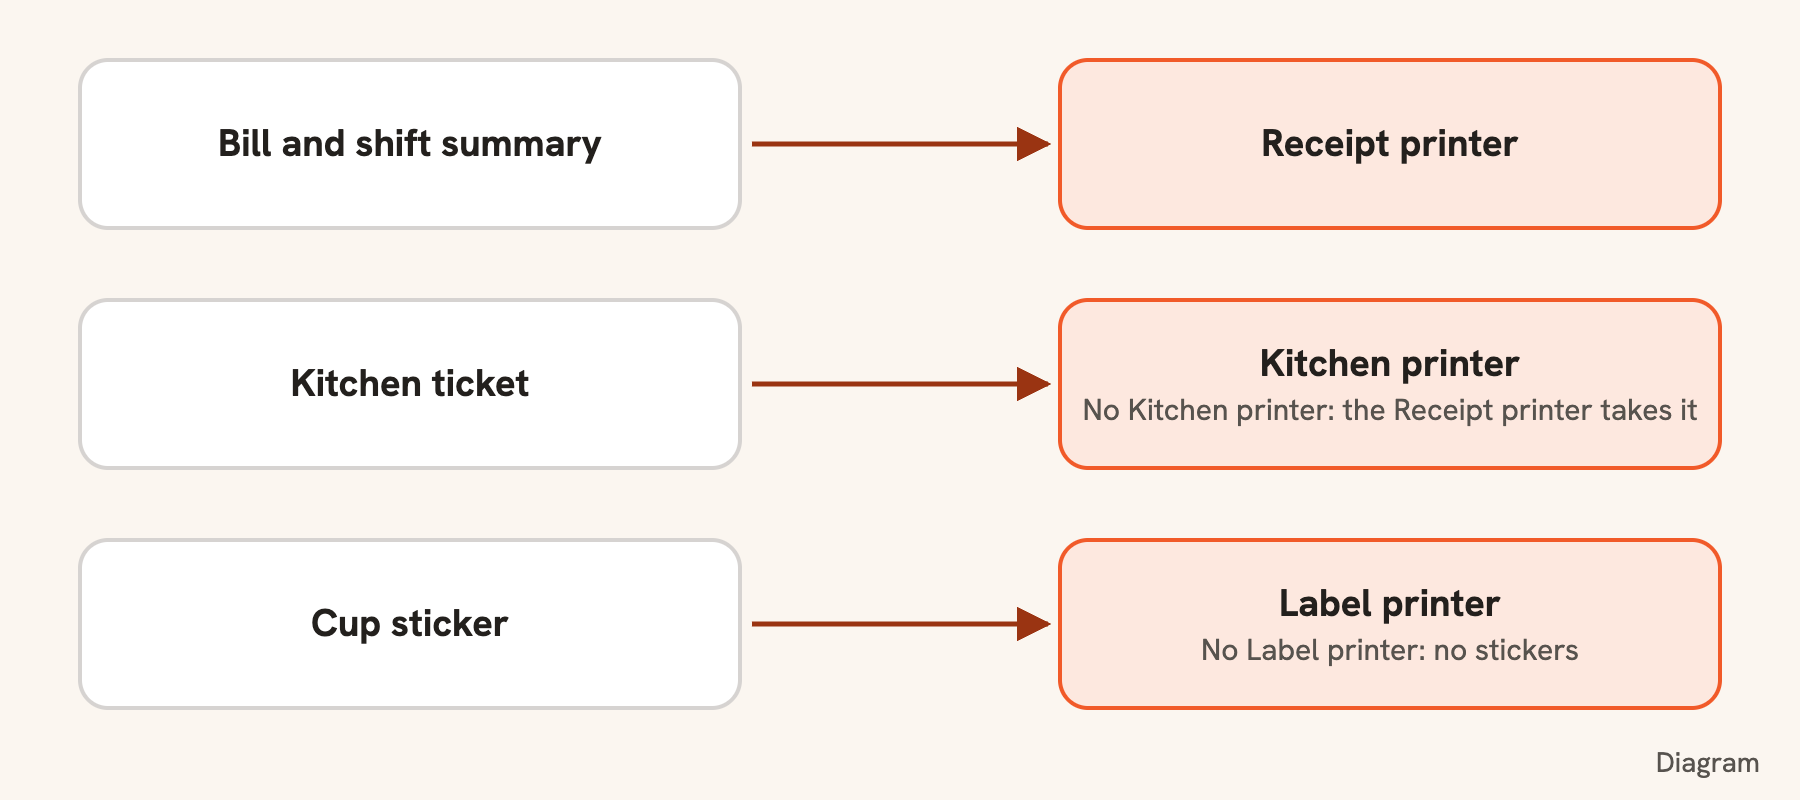
  • Bills and the shift summary print on the store’s Receipt printer.
  • Kitchen tickets print on the Kitchen printer, or on the Receipt printer if the store has no kitchen printer.
  • Cup stickers print on the Label printer, one per cup, numbered 1/3, 2/3… If the store has no label printer, none print.
Diagram: the bill and shift summary go to the Receipt printer, the kitchen ticket to the Kitchen printer or else the Receipt printer, and cup stickers to the Label printer or nowhere
A diagram, not a screen: which printer takes which paper.Full size

Which items go on the kitchen ticket or a sticker is decided by their category’s Prints on: Kitchen ticket, Order slip, both or neither. The bill always lists everything.

Several printers of the same type

Each store sends each paper to one printer:

  • One printer per type. With two Kitchen printers in a store, the first by name takes every ticket and the other stays quiet. The same goes for Receipt and Label.
  • A category does not choose a printer. It decides what goes on the ticket, not where the ticket prints, so drinks cannot go to one kitchen printer and food to another.
  • A POS’s own printer comes first. A Sunmi POS uses its built-in printer before any other of that type. Other devices never use it.
  • Copies are on the printer. To get the same ticket twice, raise Copies on that printer.

When a printer stops

Nothing moves to the next printer by itself. Tickets wait for that printer, then show as not printed with Try again: see When a ticket does not print.

To use another printer of the same type, open the one that stopped on the Printers page and switch Printing off. The next by name takes its place.

4.6Change what the bill and tickets say

Use receipt templates for your logo, words, VAT line, the other money and Khmer names, with a live preview.

Who
Owner and managers
Where
Console → Receipts

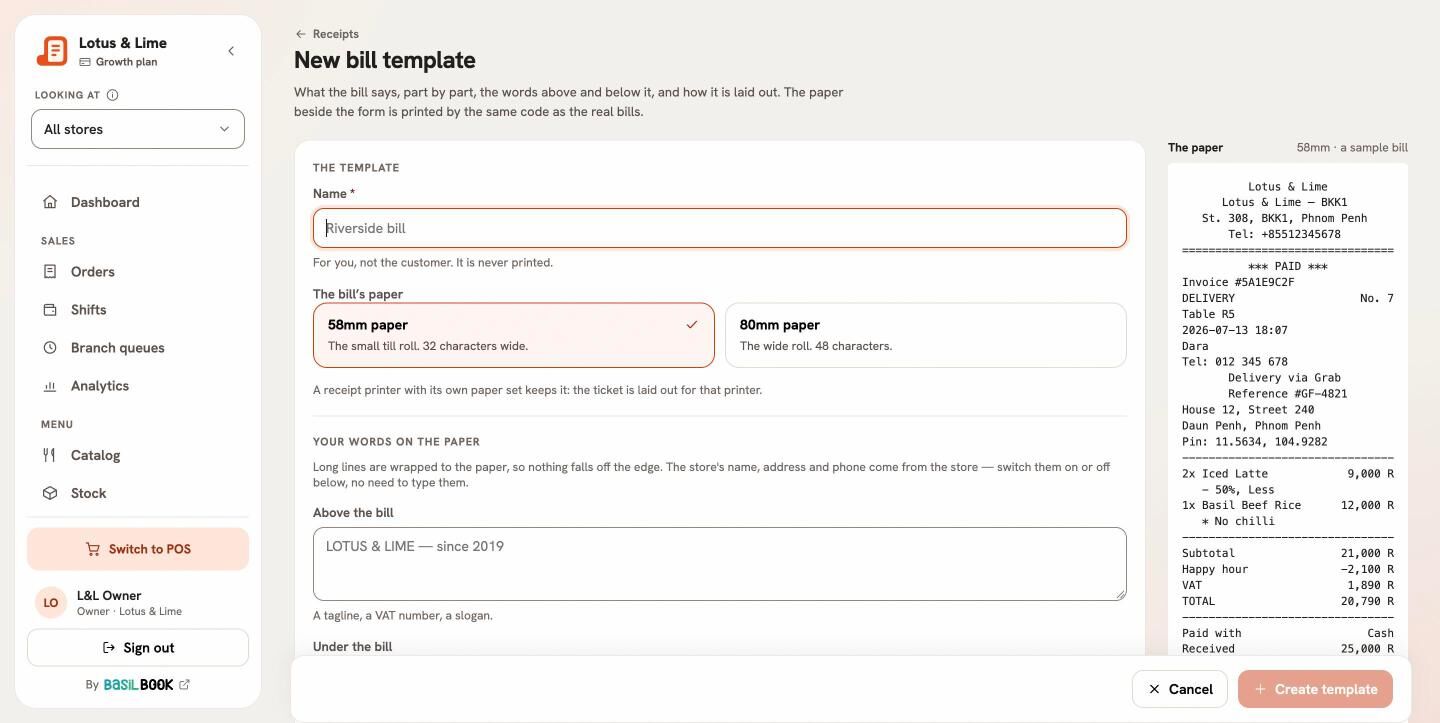
A template makes one paper: a Bill, a Kitchen ticket or a Cup sticker. The preview beside the form is drawn the same way the printer prints, so what you see is what prints.

A new bill template beside a live preview of the paper
The bill template, with the paper as it will print on the right.Full size

What a bill template changes

  • Your words on the paper: text Above the bill (a VAT number, a slogan) and Under the bill (thank you, the wifi password).
  • The top: your logo, the store’s address and phone.
  • About the order: call number, table, time, who rang it up, the customer and delivery details.
  • The items: Khmer names, choices, notes, the price of one.
  • The totals: VAT on its own line, and The other money: under the total, on every item, or not on the bill.
  • Payment: how it was paid, cash received and change.

Every item, every discount and the total always print; a template changes the words around them, never the sums.

Which store uses it

Under Where it prints, pick the Stores, or switch on Use this for any store without its own. The first template you make for a paper is that fallback.

4.7Open the cash drawer

Plug the cash drawer into a printer, choose that printer for the store, and the drawer opens whenever cash is taken.

Who
Owner and managers
Where
Console → Stores → the store → Printers → Cash drawer

A cash drawer opens through the printer it is plugged into. Plug its cable into the printer’s drawer port (most often the small RJ11 socket on the back of the receipt printer), and Bill&Go sends that printer the signal to open it.

It works with any printer Bill&Go already prints on, for example:

  • a receipt printer on the shop network;
  • a receipt printer plugged into a Printing Core box by USB;
  • a POS terminal with a printer built in, such as a Sunmi D3.
  1. Plug the drawer into the printer’s drawer port. Add the printer first if it is not on the Printers page yet.
  2. In the console, open Stores, open the store and go to Printers.
  3. Under Cash drawer, choose The printer the drawer is plugged into.
  4. Leave Open it on every cash payment on. Each choice is kept as you make it.

When it opens

  • A cash payment, with or without change to give back.
  • Cash given back on a refund.
  • Open the till, Close the till, Put cash in and Take cash out.

Card, QR and other payments never open it. Switch Open it on every cash payment off and it opens only when someone presses Open drawer.

Open it without a sale

Owners and managers have Open drawer on the POS’s Accounting screen, for change or a coin that fell in. Every time is written in the shift’s report with who and when: Drawer opened. Staff do not have the button.

Good to know. The drawer opens only while someone stands at it: if the printer is off, nothing opens later by surprise. Press Open drawer again once it is back.

Tip. The drawer does not open? A few drawers are wired to the other pin of the port. Choose Pin 5 under Cash drawer and try again.

4.8When a ticket does not print

What the printing signs mean, where tickets wait, and how to print them again.

Nothing is lost when the printing computer is off: tickets wait and print when it is back. A printer that does not answer is tried again for a few minutes; then the ticket shows under Did not print, with Try again.

Check the signs

  • The POS’s printing button says Printing on, Printing off, Out of paper, Printer open or Printer jammed, and how many tickets are waiting.
  • The Printing app’s dot: green is Printing is on. Amber or red says what is wrong, like Cannot reach the server right now.
  • The console’s Printers page shows each computer and box, and when it was Last heard from.

Fix it

  1. Load paper, close the lid or clear the jam. Tickets that waited for that print by themselves.
  2. If the Printing app says Printing is stopped, open it from the tray or menu bar, or choose Restart printing.
  3. Choose Print a test page on every printer in the app. A printer that does not print has the wrong IP address or is off the network.
  4. A ticket that still did not print offers Try again on the POS and in the console.

Good to know. After a power cut mid-print, Bill&Go asks whether the ticket printed or should print again, so the kitchen never cooks a dish twice.

Still stuck?

Tell the Bill&Go team in Phnom Penh what you were trying to do, and we'll walk you through it.

Talk to us