Good to know. Taking payments and adding items stay at the POS. Plans and billing are on the web console only.
3.2Connections, keys and stickers in the Console app
What used to need the web console: DailyBrew hours, API keys, menu languages, sign-in methods and QR stickers for the tables.
Who
Owner and managers (Settings: the owner)
Where
Console app → Manage, Analytics and Account
Hours and sales by person
Open Manage, then Settings, and connect DailyBrew. Hours and sales by person then shows on Analytics: each person’s days, hours, late arrivals and early leaves beside what they sold. Someone matched to nobody here has Who is this? to pick them from the team. See Staff hours from DailyBrew.
API keys
Open Manage, then Settings, then API keys, and press Add API key: a name, what it can do and, with more than one store, which stores. The whole key is shown once, with Copy. Each key has Rename and Revoke. See Connect another system with the shop API.
Menu languages
Open Manage, then Menu languages, and switch on the languages your table QR menu offers. Each saves as you tap it. Dish names in those languages are typed on the web console.
Sign-in methods
Open Account, then Sign-in methods. Each person links their own Google account, or Apple on an iPhone or iPad, and can unlink one. Telegram is linked on the web console and only shown here. Bill&Go keeps your last way in, and says so.
QR stickers for the tables
Open Manage, then Tables, and press Print QR stickers for the tables of a room, or Print sticker on one table. Choose the paper, an A4 sticker sheet or one per label; the phone’s own print window then opens, where you pick a printer or save a PDF. New sticker code replaces a sticker that was copied or lost, and the old one stops at once.
Telegram and QR payments
Open Manage, then Stores, the store’s settings and Connections for QR payments, BasilBook and Telegram. A shop still on its own Telegram bot can move to Bill&Go’s with Move to @…, and links its groups again.
3.3Notifications and the inbox
Which events ring your phone, quiet hours at night, and how to switch each one off.
Who
Everyone using the apps
Every notification also lands in the app’s Inbox, so nothing is missed when the phone was off. Each event has its own switch.
In the POS app: new online orders, orders from tables, order ready (for whoever rang it), tickets that did not print, a printer not answering, and a POS left open.
For owners and managers (Console app): the same orders and printing problems, a printing box offline, refunds, voids, low stock, and the end-of-day summary (off until you switch it on).
Between 22:00 and 07:00 shop time, everyday events go to the inbox without a sound. Urgent ones, like a new online order or a printer that stopped, still ring.
Tip. Bills from Bill&Go, a trial ending or a payment that failed go to the owner’s email, never to the apps.
3.4Find an order and see what happened
Look up any order in the console, see what was ordered and paid, and its history.
Who
Owner, managers and staff
Where
Console → Orders
Open Orders in the console. Pick the days with From and To; Back to today returns to today.
Type in Find an order to search the orders shown. Show older orders looks further back.
Click an order to open it.
The order shows who rang it up, the invoice, the customer and delivery details, What was ordered with its totals, Payment (cash in, change, refunds) and What happened: every step, with who and when.
Every order offers Kitchen ticket, Bill and Cup stickers to print again. A cup sticker reprints with the same number, marked REPRINT.
A split bill shows each share under Split bill: what it covered, how it was paid, and what is left to pay. See Split the bill.
Tip. With more than one store, pick a store in Looking at at the top of the side menu to see just that counter.
Good to know. Orders keep the names and prices they were sold at. Changing a product later never changes an old receipt.
3.5Count stock
Follow how many of a product each store has, receive deliveries and record counts and waste.
Who
Owner and managers
Where
Console → Stock
On the product, open the Stock tab, turn on Count stock, and set Warn me when stock falls to.
Open Stock in the console and pick the store in Looking at.
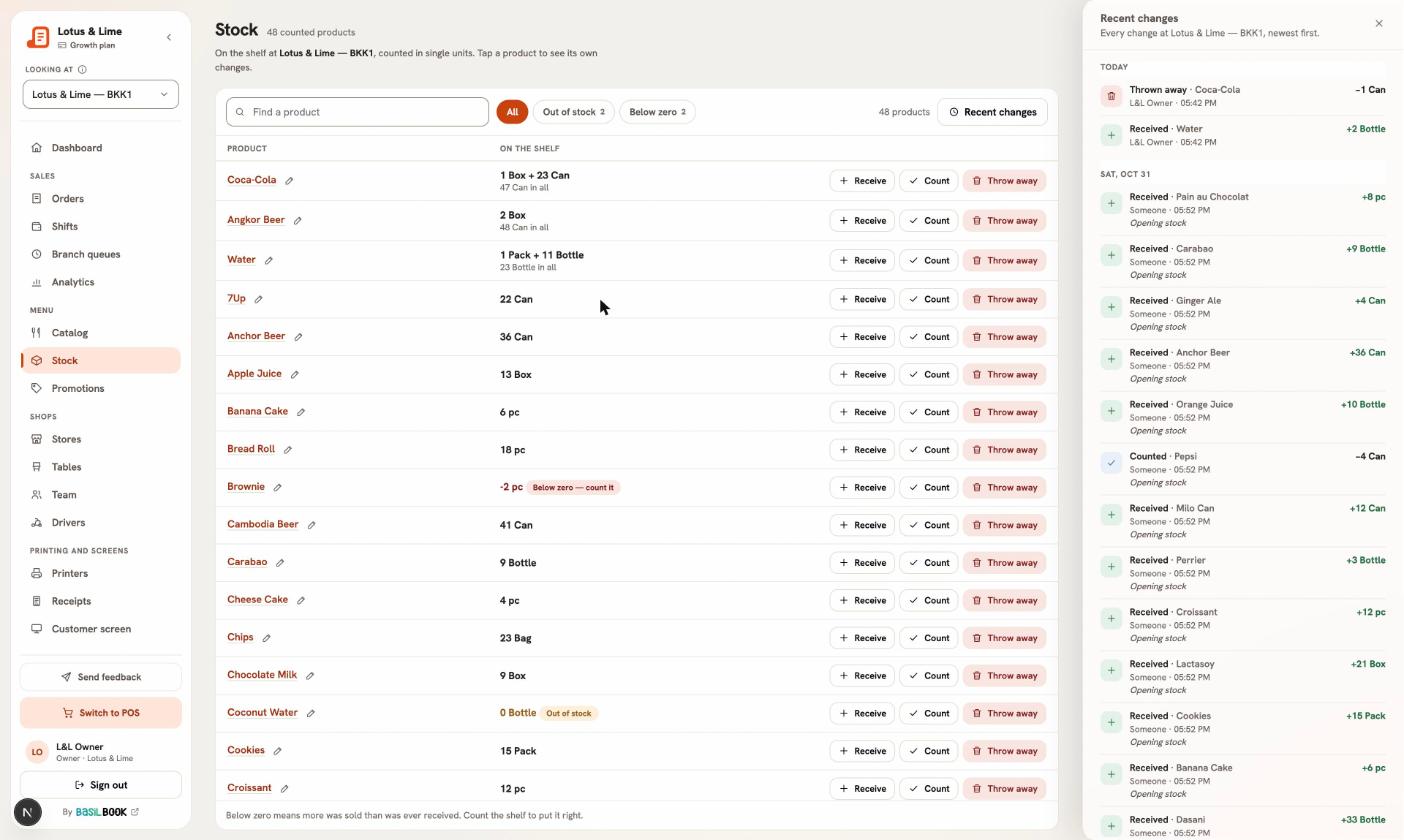
Press Receive when a delivery comes in, Count after counting the shelf (then Record count), or Throw away for waste. Type How many, and a Note if you like.
Each sale takes its units off at that store. Press Recent changes for every movement and who made it, day by day, or tap a product for just its own; tap the next product and the sheet switches to it.
Stock at one store, with its recent changes beside it.Full size
Good to know. A sale is never stopped by stock: if the count is wrong, the order still goes through and the count goes below zero, so you can see it and correct it.
Tip. The POS shows Low and None left on products running out, and owners and managers can get a low-stock notification.
3.6Add a promotion
Set up percent off, money off or buy some get one free, on the whole bill or certain products.
Who
Owner and managers
Where
Console → Promotions
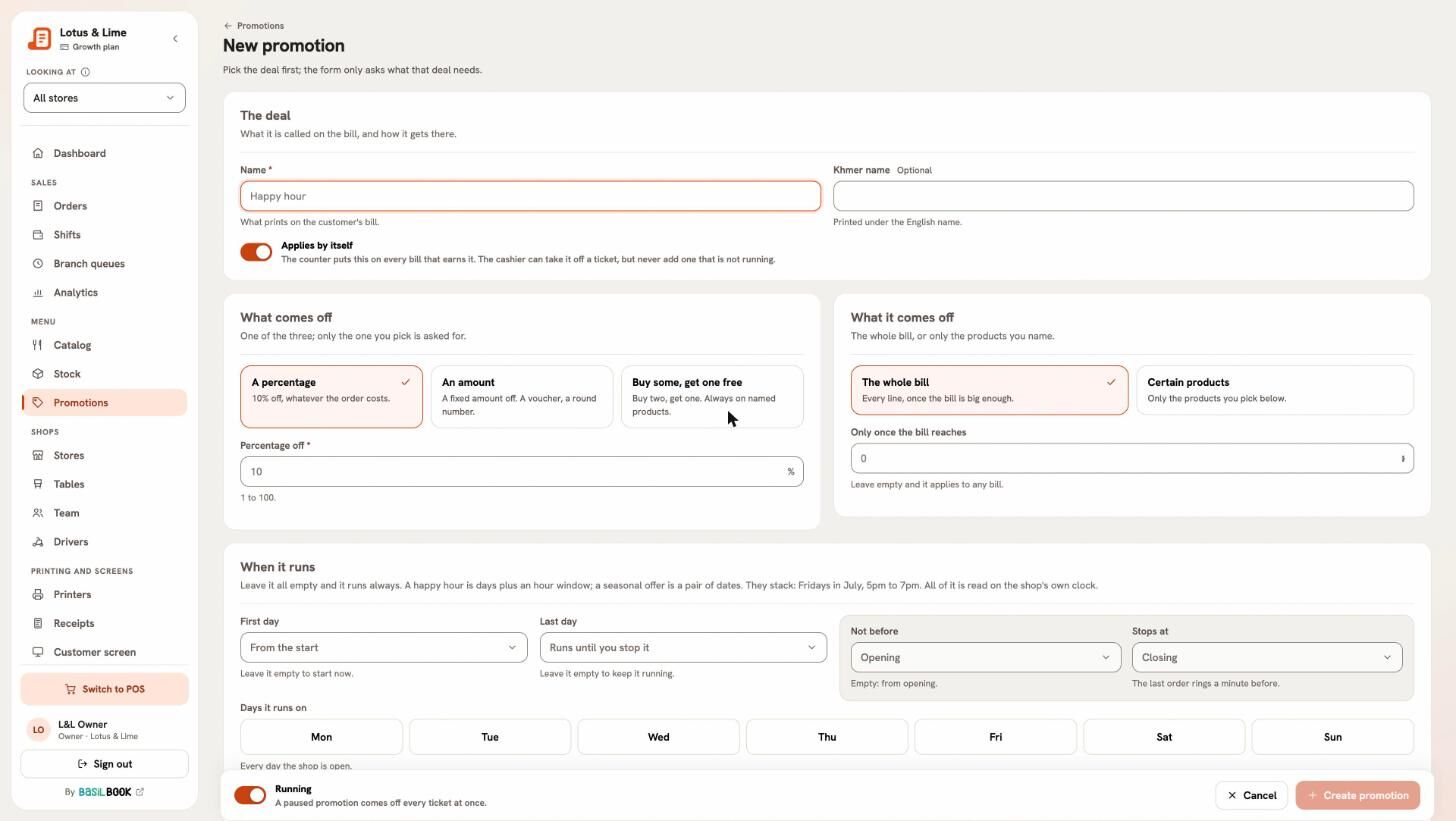
Open Promotions and add a new one.
Under The deal, type the Name — it prints on the customer’s bill — and the Khmer name if you want it.
Leave Applies by itself on for it to land on every bill that fits. Turn it off for a deal the cashier picks at the POS.
Under What comes off, choose a percentage, An amount, or Buy some, get one free (with They buy and They get free).
Under It applies to, choose The whole bill (and, if you like, Only once the bill reaches an amount) or Certain products.
Set When it runs and Where it runs (see below), then press Create promotion.
Discounts never add up on each other. If two fit, the one higher in Order of play goes first.
Tax is worked out on the price after the discount.
The POS cannot change a promotion; it can only take one off a bill.
Turn Running off to pause a promotion without deleting it.
3.7Happy hours, days and branches
Run a promotion only on certain dates, hours, weekdays or stores.
Who
Owner and managers
Where
Console → Promotions → the promotion
In When it runs:
First day and Last day for a promotion that ends.
Not before and Stops at for the hours, like 14:00 to 17:00.
The day buttons, Monday to Sunday, for the days it runs.
In Where it runs, pick the Stores. Empty means every store, including ones you open later.
Good to know. Times are your shop’s own time, the same clock the POS shows.
3.8Let customers order from the table
Customers scan a QR at their table, order from their phone, and pay at the end.
Who
Owner and managers switch it on; staff run it
Where
Console → Stores → the store → QR ordering
In the console, open Stores, the store, and the QR ordering tab.
Switch on Let customers order from their phone and choose how long a table’s QR works.
At the POS, seat the table, then Print QR or Show on screen.
Each round the customer sends waits on the POS: Accept sends it to the kitchen, Turn down says why. They pay at the end, and the QR stops once the table is paid. More time, Print a new QR and Stop QR are on the table.
Rather keep a QR on each table? Tables → Print QR stickers prints one sticker per table. It works once staff seat the table; switch on Guests can start ordering from the table sticker and guests at a free table scan and order with nobody seating them first. Every round still waits on the POS.
Good to know. QR ordering needs Starter or above. Switching it off stops every table’s QR at once.
3.9Take pick-up orders from a link
Share a link or poster so customers order ahead from their phone and collect at the counter.
Who
Owner and managers
Where
Console → Stores → the store → Pick-up ordering
Open Stores, the store, and the Pick-up ordering tab.
Switch on Let customers order ahead for pick-up.
Under How customers pay, keep Pay at the counter on pick-up.
Copy Your link to your Facebook page or Telegram, or print the poster for the counter.
Orders arrive on the POS to accept like any online order.
Good to know. Pick-up ordering needs Starter or above.
3.10Delivery partners and your own riders
Add Grab, foodpanda or your own rider as a delivery channel, with the commission each takes.
Who
Owner and managers
Where
Console → Stores → the store → Delivery channels; Console → Drivers
Open Stores, the store, and the Delivery channels tab. Press Add a channel.
Add its Logo, the Name on the button and the Khmer name.
Set its Commission: a percent, an amount per order, or both.
Choose Where it is offered, and press the button to add it.
At the POS, the channel is picked on a Delivery order. The commission is worked out on the food after discounts and kept on the order, never on the customer’s bill. Shift reports show each channel’s sales, commission and what the shop kept.
Your own drivers
Add drivers in Drivers with Add driver: their name, phone, the stores they ride from, and a username and password to give them. Orders waiting to go out can be assigned there.
The owner can always take a delivery too, on every plan: they are offered beside the drivers, and sign in to the Bill&Go Rider app with their own account.
Good to know. Drivers count toward your plan’s driver limit; Free has none. The owner never counts.
3.11Hand an order to another branch
Send an online order to the branch that can make it, by hand or by itself when a branch is busy.
Who
Owner, managers and staff
Where
Console → Orders → the order → Hand over to another branch
Open the order and press Hand over to another branch.
In Which branch makes it?, pick a branch. The quickest one is marked Quickest now.
Press Hand over to that branch.
The order and its kitchen ticket go to that branch. The customer keeps the same price and reference; the order gets the new branch’s call number.
Let Bill&Go share them
In Settings → Online orders, the owner can switch on Share online orders between branches and set the Minutes a branch has to accept an order. An order not accepted in time moves to the quickest branch. Branch queues in the console shows each branch and what moved today.
Good to know. Only online orders move. Pick-up orders move only by hand, and POS orders never.
3.12Reset a password or remove someone
Set a new password for someone who forgot theirs, or take a person off the team.
Who
Owner and managers (removing: owner only)
Where
Console → Team → the person
Reset a password
Open Team and click the person.
Press Email a reset link if they have an email. Otherwise type a New password.
Leave on that they choose their own when they next sign in, and press Save changes.
They are signed out everywhere. An invite that never arrived can be sent with Send the invite again.
Remove someone
The owner presses Remove on the person. Their past orders and shifts keep their name.
3.13Close or remove a store
Close a branch for a while, or remove it for good.
Who
Owner and managers
Where
Console → Stores → Remove
To stop orders for a while, turn Open for business off on the store. A closed store takes no orders and keeps everything.
To remove it, press Remove on the store in Stores.
Read what goes with it: the store leaves the POS and the console, and its tables go too. Past orders are kept.
Type the store’s name and press Remove permanently.
Good to know. There is no undo. If you may open again, choose Close instead.
Still stuck?
Tell the Bill&Go team in Phnom Penh what you were trying to do, and we'll walk you through it.